Painting 101
When deciding to paint a room in your home, it might be tempting to just layer a drop cloth over every piece of furniture in the space and just get to it. But with a bit more prep work, your newly painted room will look a lot better.
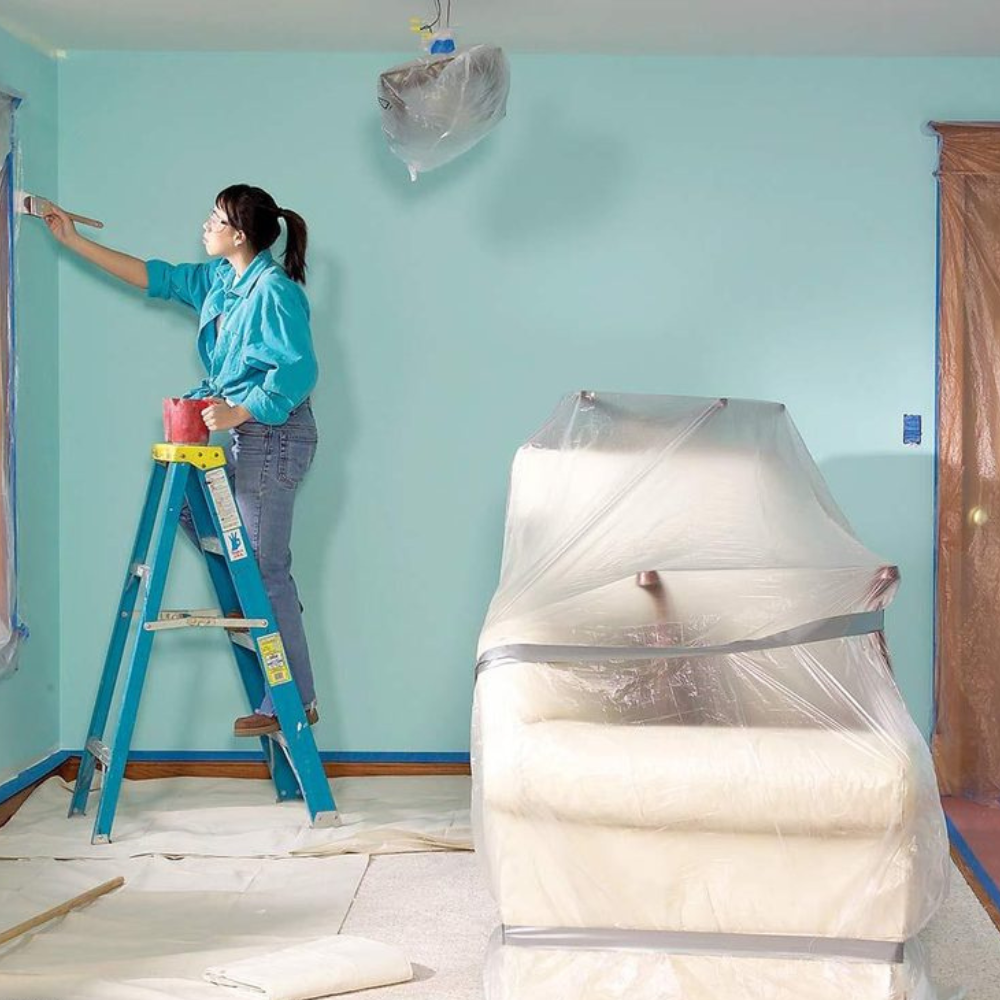
If you can get everything out, that’s ideal, but large and heavy furniture can stay — just try to move it away from the walls as much as possible. Then, cover everything left with a drop cloth. This way, you’ll have an easy space to maneuver in that’s free from any potential accidents.
No More Roller Fuzz
So, you prepared everything, you got all new rollers, and you’re ready to get to painting, right? Wrong! New paint rollers might look great, but they also need some prepping before you use them. Otherwise, you risk all that fuzz mixing with your painting and getting all over the walls.
To fix this, just take some packing tape and use it like a lint roller. Basically, roll your new roller over the sticky side of the tape until there’s no more fuzz on the roller. Trust us, with this quick hack, you’ll save the time it would have taken to fix the fuzz-filled paint.
Keep it Clean
If you’ve ever used a paint tray while working on a space then you know the struggle of trying (and failing) to clean up all the paint that was left on the tray once you finished.
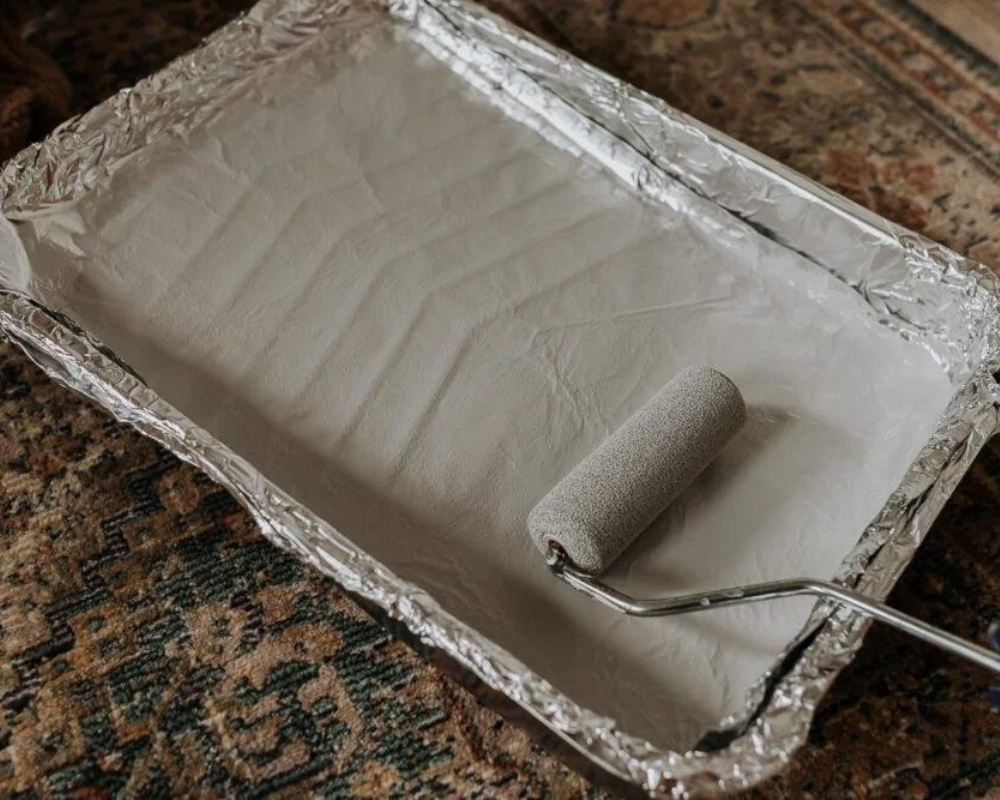
In this case, aluminum foil is your friend. Before pouring the paint in, just cover the entire top of the tray with aluminum. Then, once you’re done painting, simply take off the foil and throw it (and the mess) away.
Heating Things Up
Masking tape is one of the most important tools in a painter’s arsenal. However, while it’s great for ensuring that paint doesn’t go where you don’t want it, it can leave a sticky and messy residue behind once you peel it off.
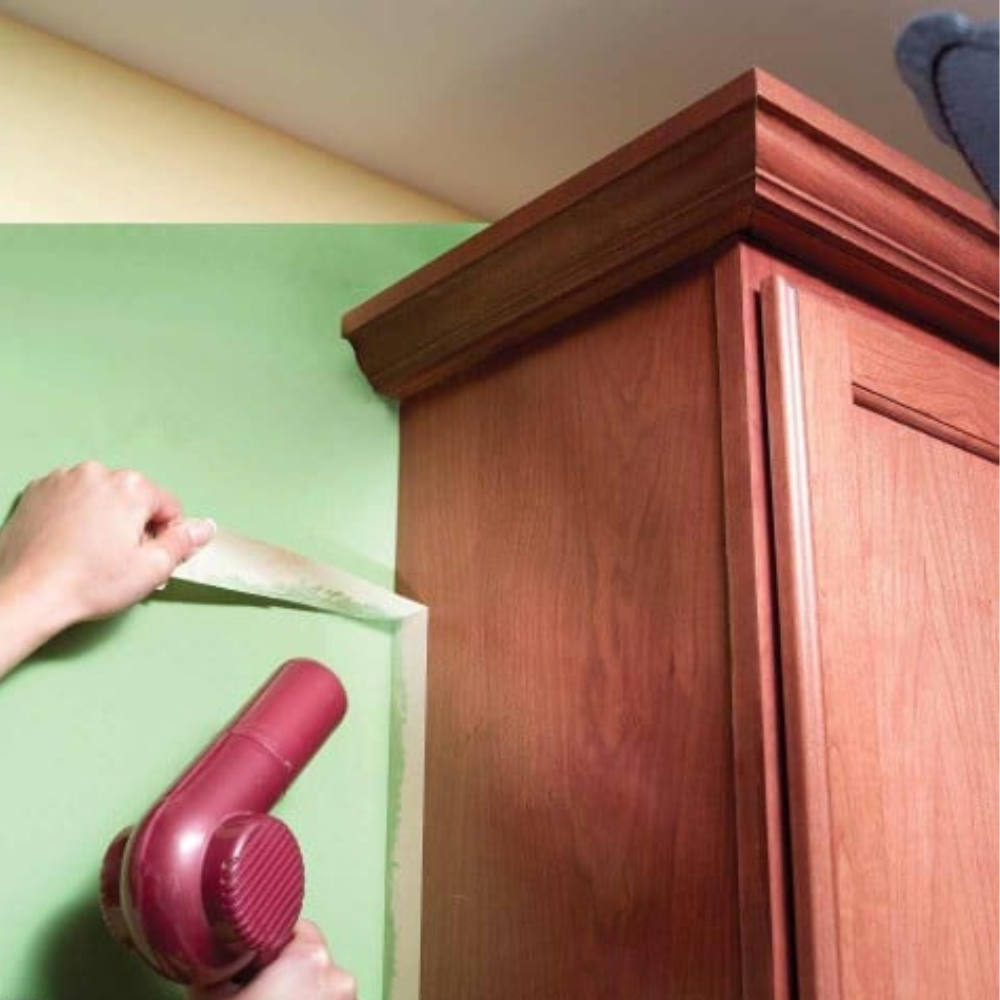
This hack, thankfully, will make sure that your furniture remains stick-free. Simply use a hair dryer or heat gun to warm the tape before you peel it. The heat will melt some of the glue, allowing the tape to become less adhesive.
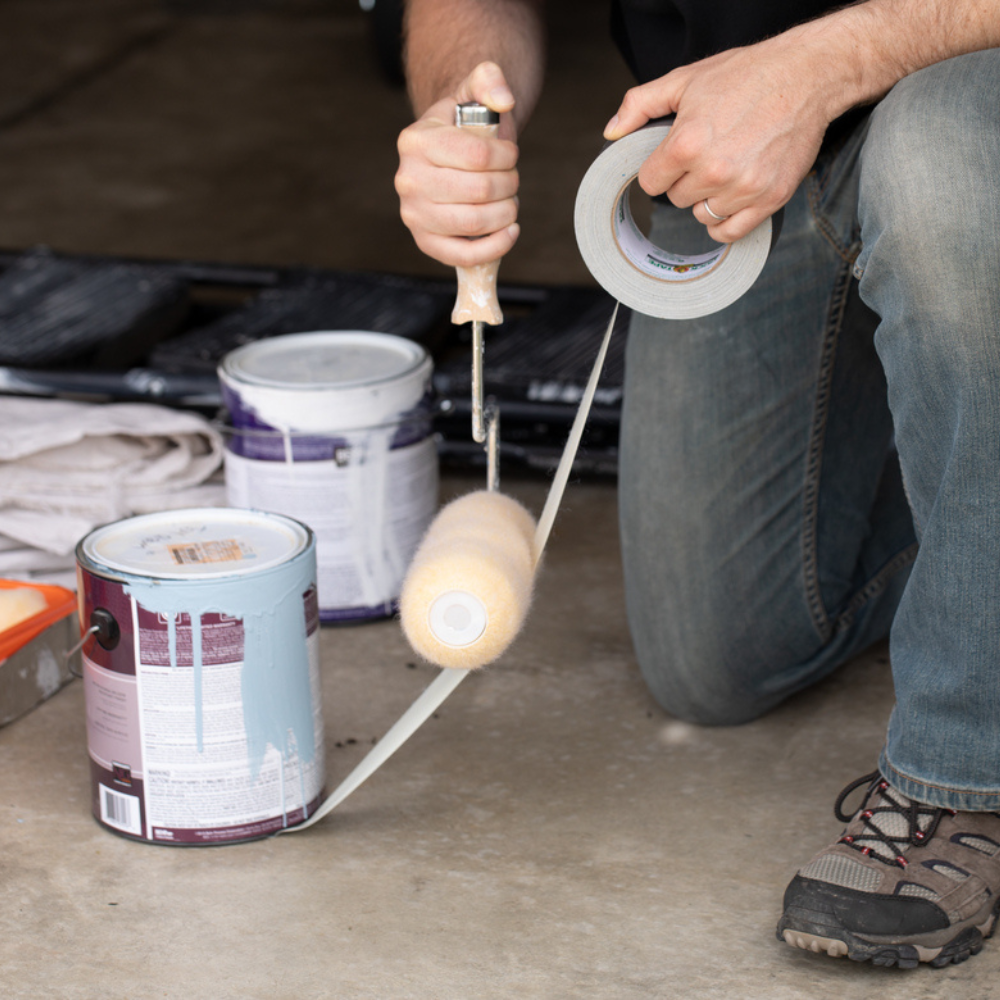
The Rubber Band Hack
If you’re considering any home improvement project, you should have at least a few durable rubber bands around. Here’s how these versatile objects can help you when you’re painting: Take a large band and stretch it vertically on your paint can.
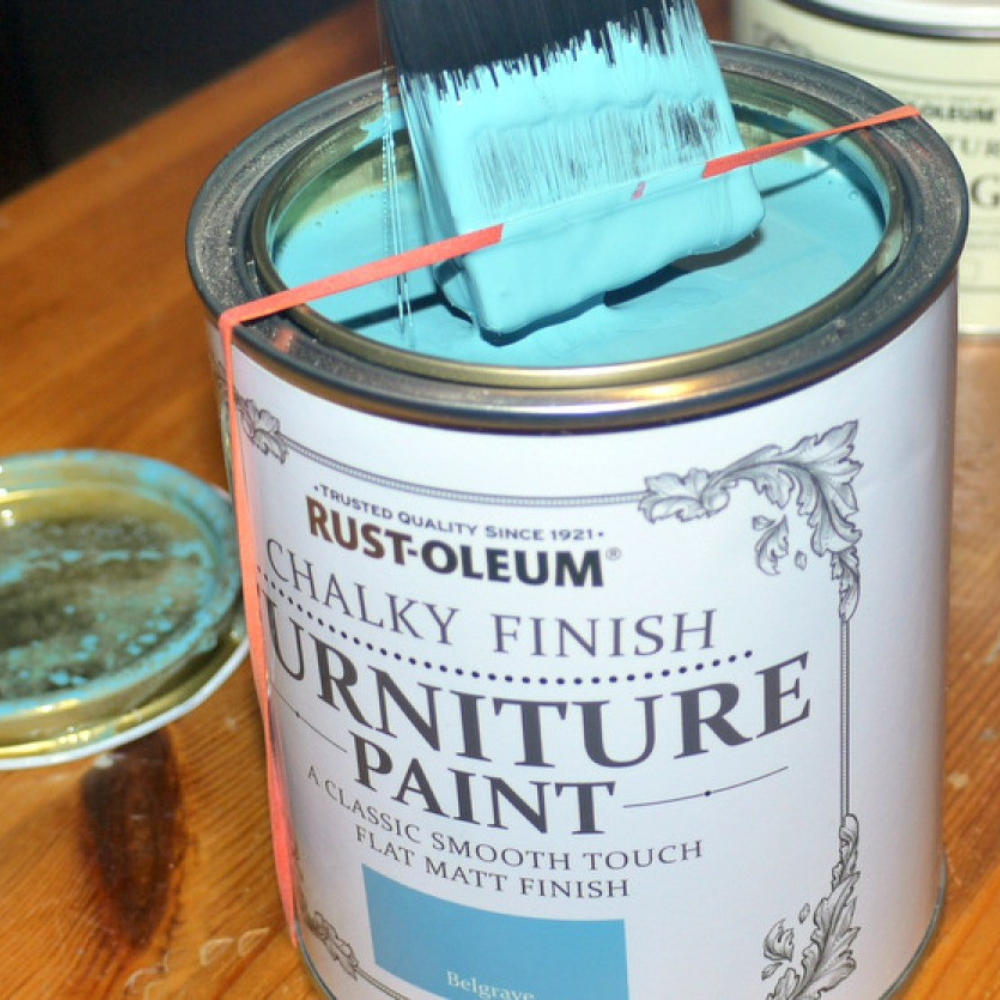
Make sure that your rubber band is stretched out right over the paint. This will allow you to get the excess paint off your brushes without having to get that paint on the edges of the can. Once you’re done, just throw the rubber band away and seal your clean can.
Paint Over for a Clean Finish
Ever wondered how professional painters get those perfectly crisp straight lines? They’ve got a trick! Paint a base layer and let it dry. Then, place your painter’s tape where you want your crisp line to be.
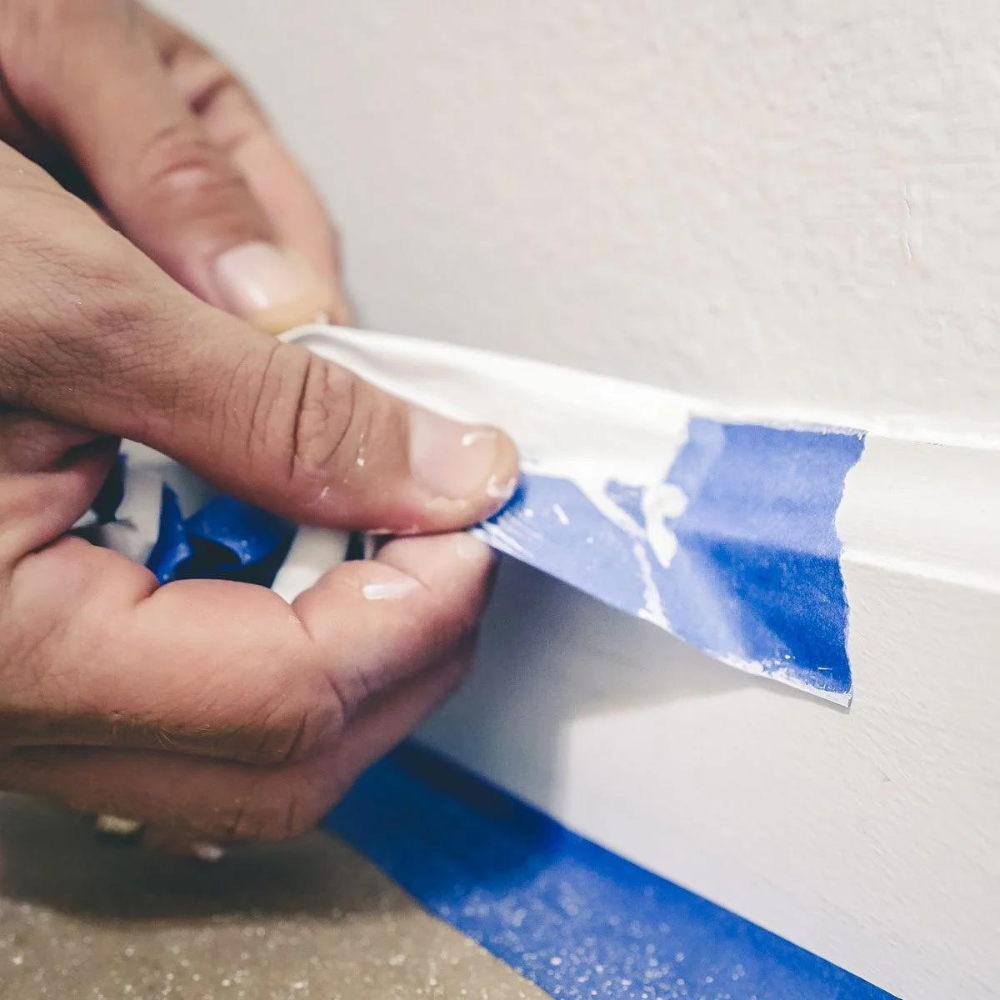
Paint the edges on top of the tape on the side you’re planning to paint with the base layer. Now, paint your chosen color on top (you can cover the same area of the tape that you already painted). Once dry, take the tape off and enjoy your perfect line.
Moisturize
This might seem pretty weird, but trust us, this little tip is going to save you a lot of scrubbing time in the shower after a painting project. Before you begin painting, put lotion on any exposed skin (ensure your arms and face are covered).
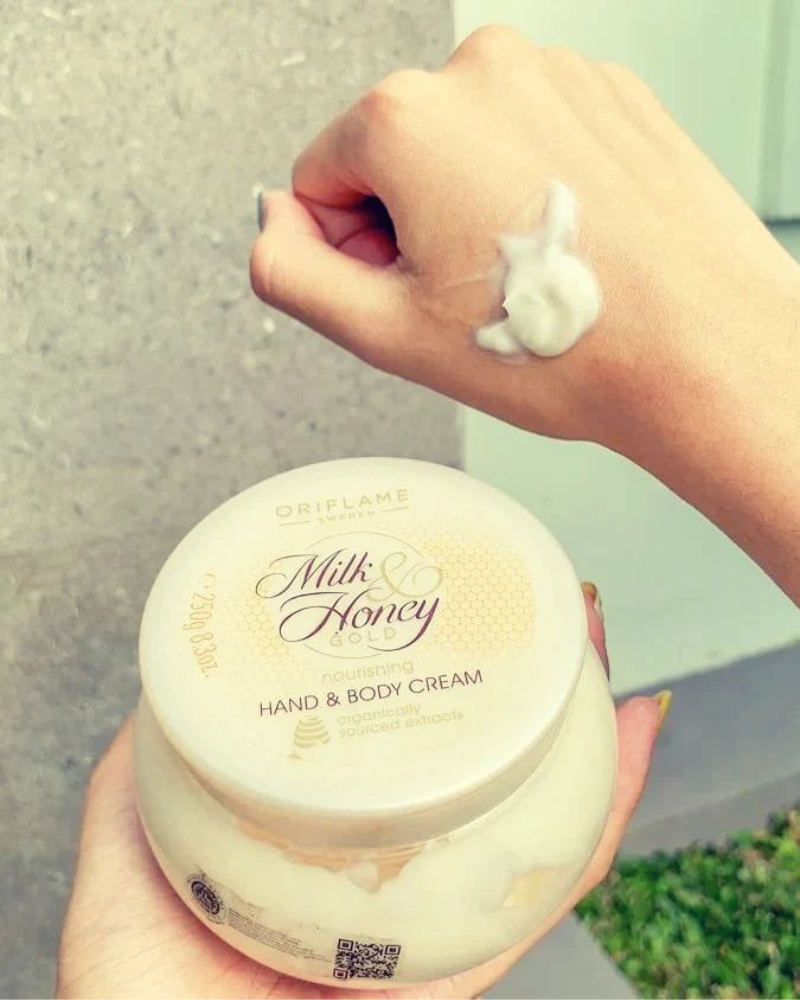
This will ensure that any paint splatter that has reached your skin will easily wash off afterward. We also suggest covering your hair with a rag or bandana to keep it safe from any splatter.
Ceiling First
This one’s pretty simple — if you’re intent on painting an entire room, start with the ceiling, then move on to the walls. Keep in mind that no matter how much you try, painting the ceiling can and will be messy.
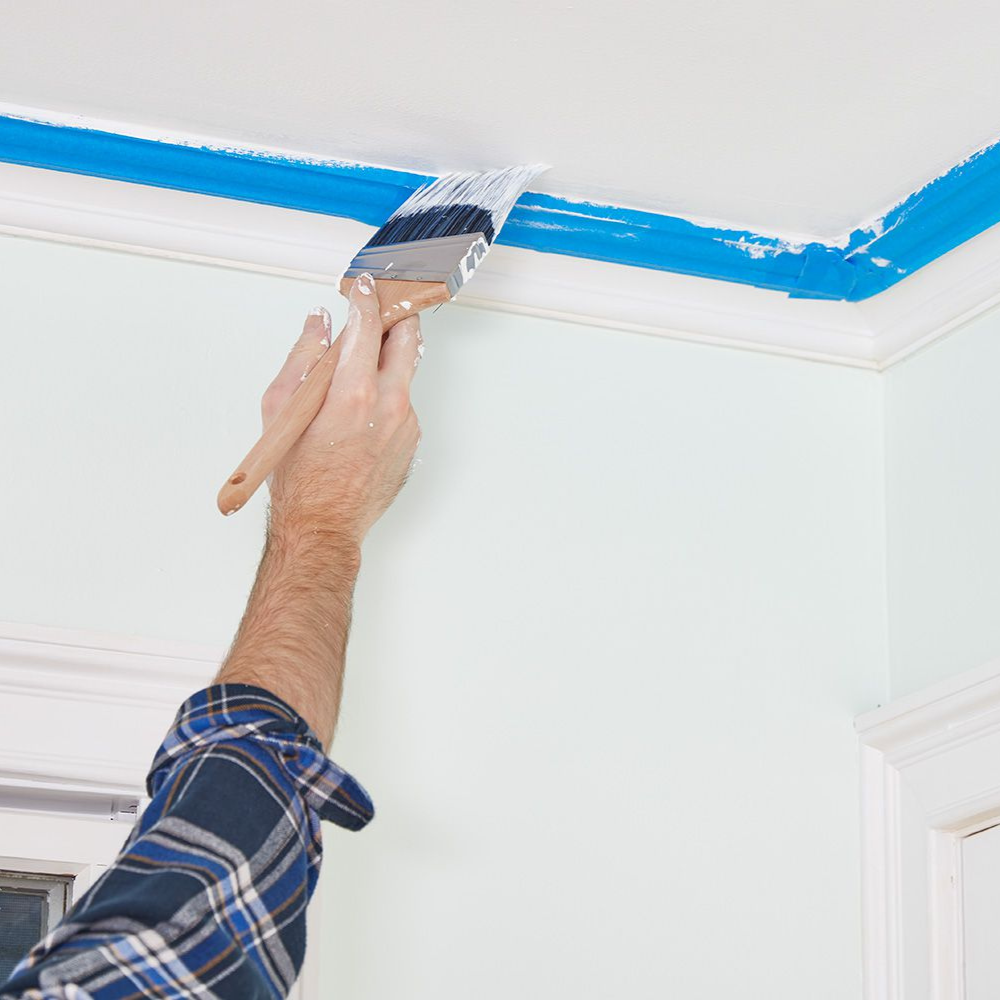
So, instead of having those paint specks mess up your newly painted walls, just paint the ceiling first. This way, all the mess you made will be covered when you paint the walls.
Ditch the Drop Cloth
Yes, drop cloths are a staple of painting, and they certainly have their uses, but there’s a cheap, easy, and useful alternative that might actually be better. Basically, when it comes to covering your floors when you paint, choose cardboard.
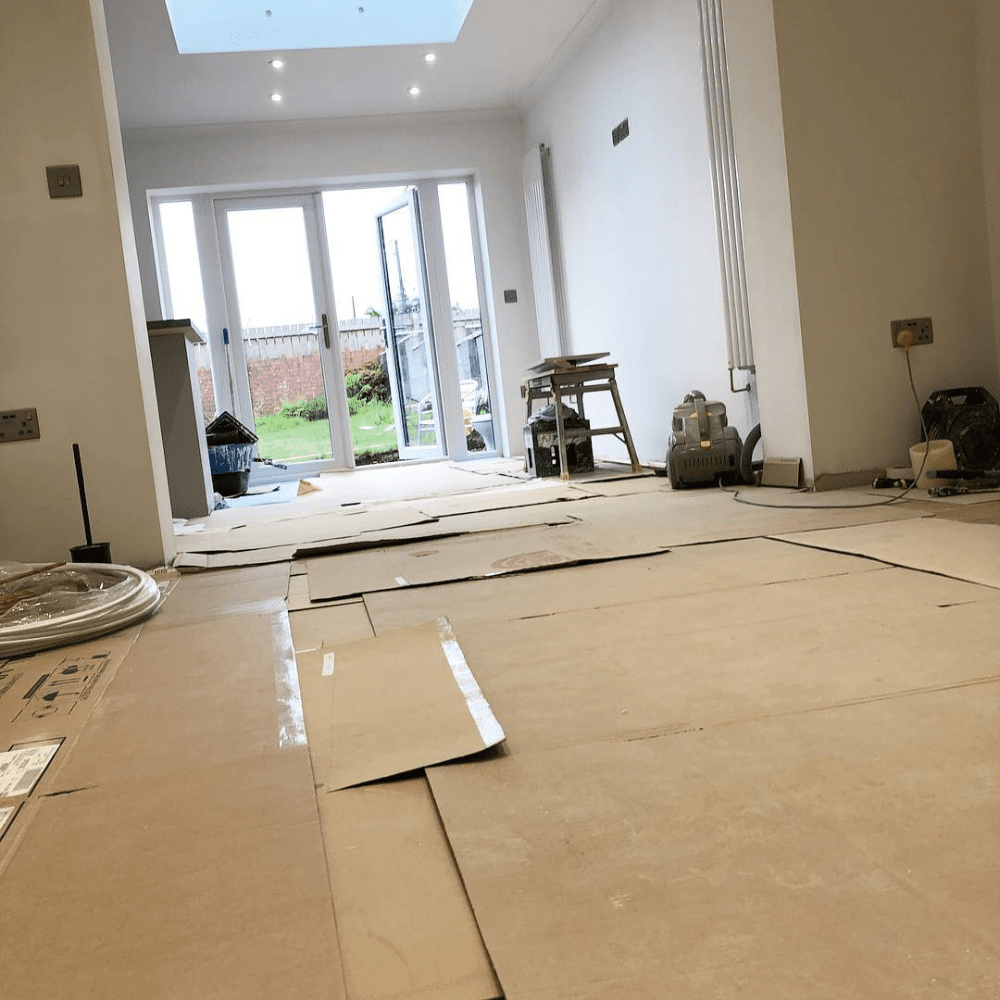
Grab some cardboard boxes, open them up, and lay them out on your floor (for better coverage, do two layers). Make sure your entire floor is covered. They actually work better because they’re heavier, making them sturdy and less prone to slipping.
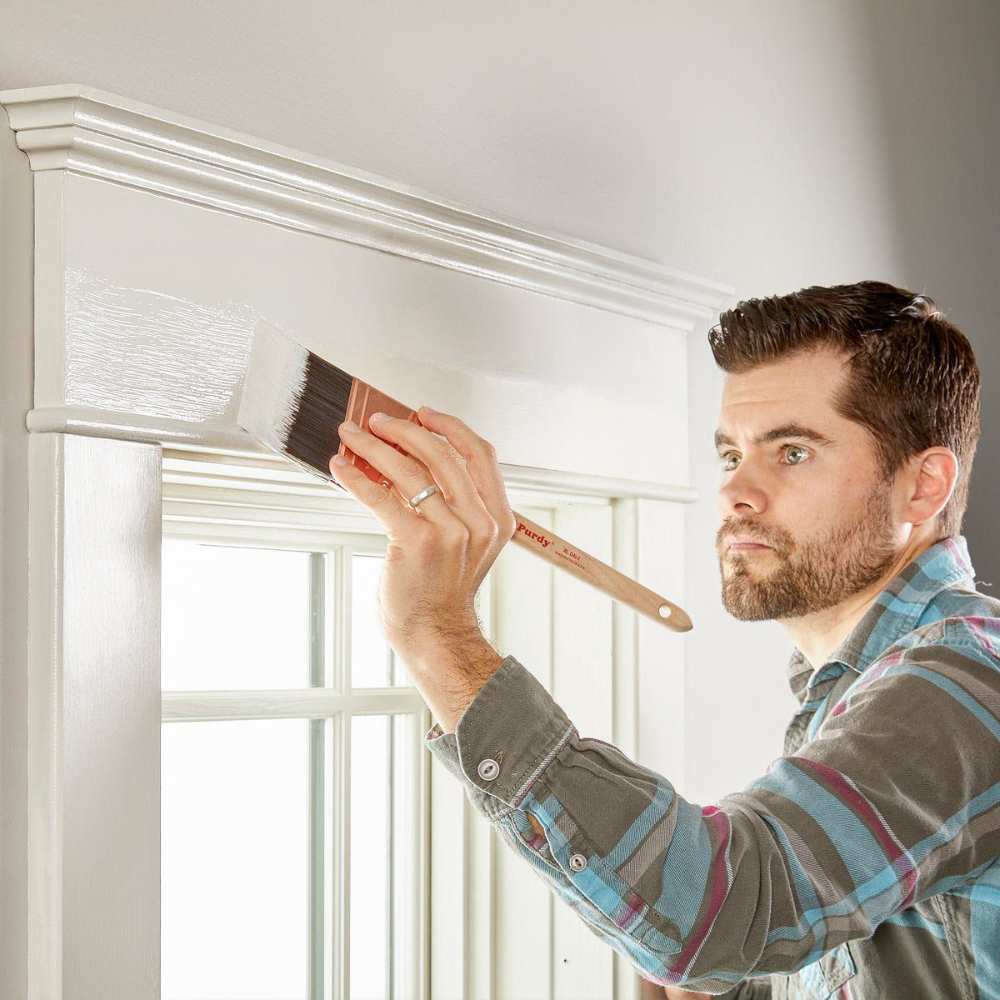
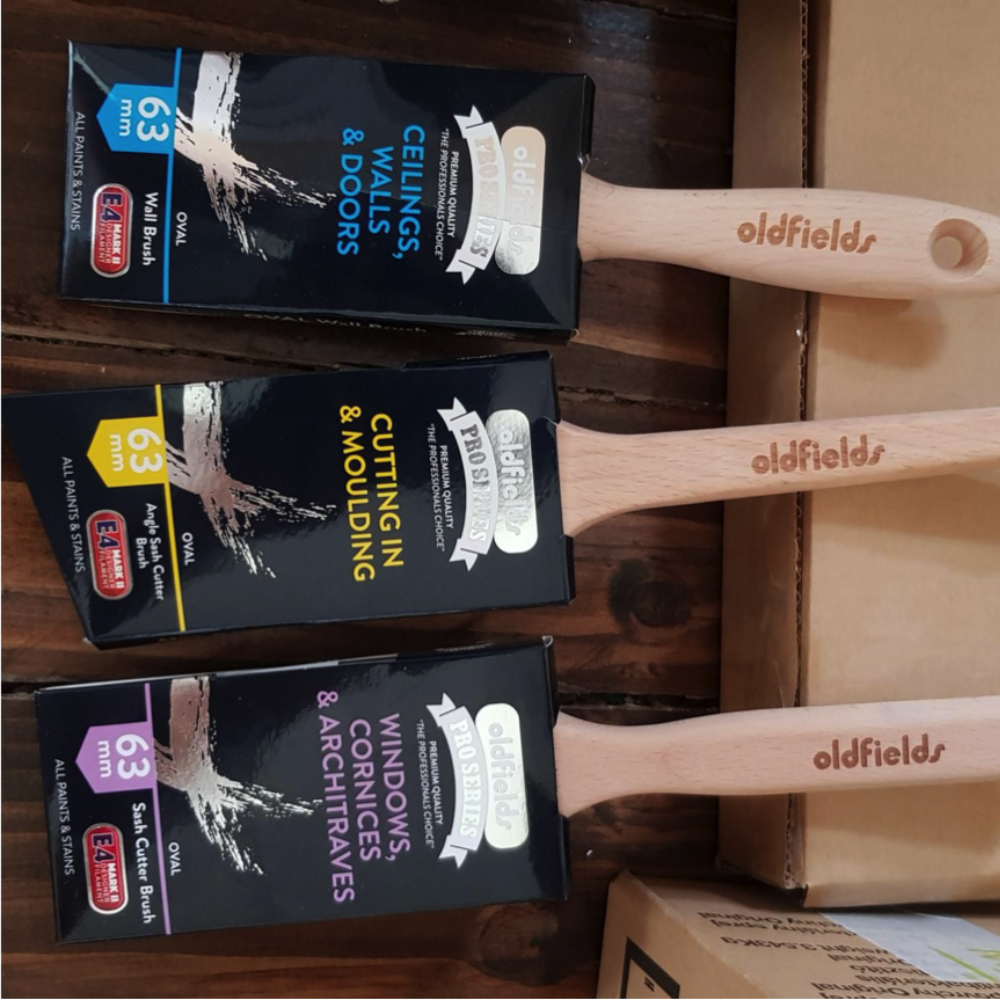
The Slap and Smooth
Now that you’ve decided to paint your walls, don’t forget to give your baseboard a new coat. Painting woodwork, however, is slightly different. According to a certified handyman, when painting your baseboard, you want to slap on the paint, then smooth it out.
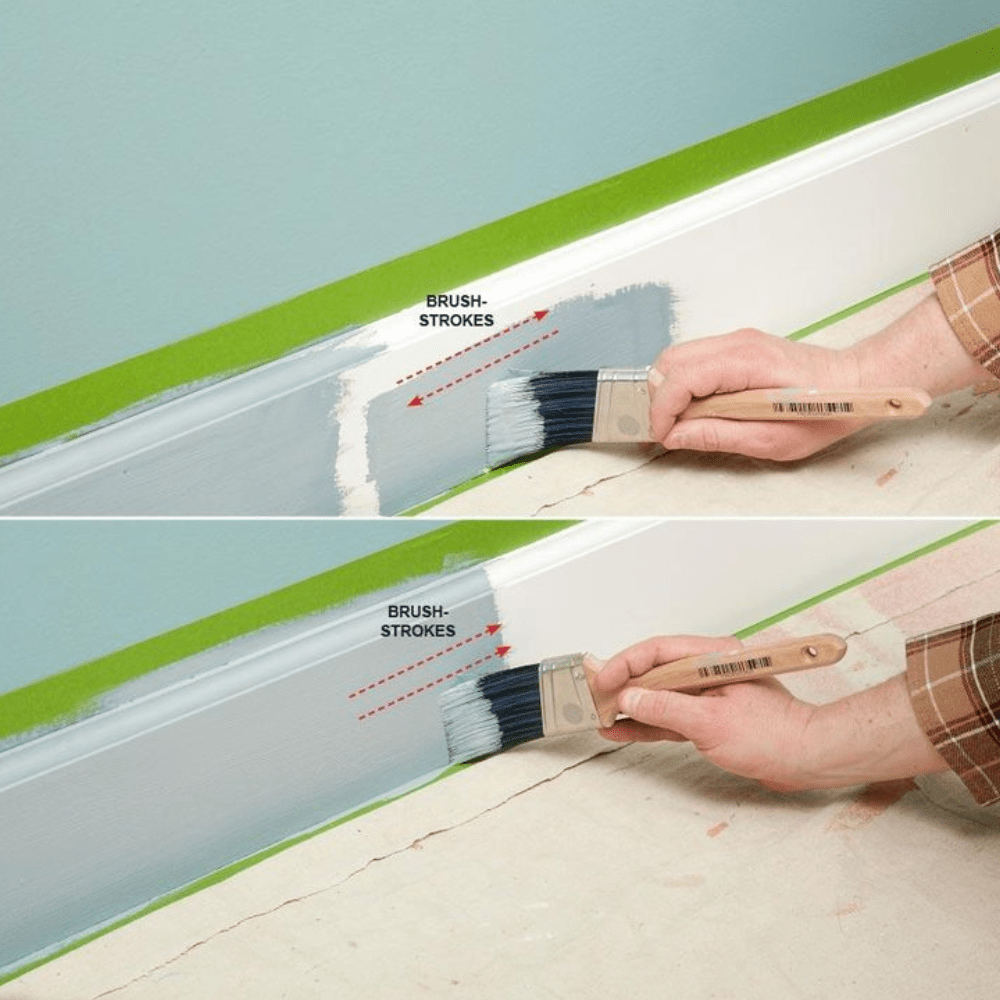
Basically, take a brush, load it with paint, and slap it on the desired area. Then, with short strokes, spread the paint. Finally, blend the area you’re currently working on with the previous section with long strokes in one direction. Work in small sections.
DIY Extender
Those fancy adjustable roller extensions might look mighty enticing at the hardware store. But, if you’re not a pro, take our word for it, you don’t really need them. In fact, you probably have the perfect DIY solution right at home.

Luckily, the vast majority of roller handles fit perfectly on a broomstick (with some, you can even screw them on). So, if you need to reach high places while painting a room, just switch out your broom for a roller and enjoy the added length.
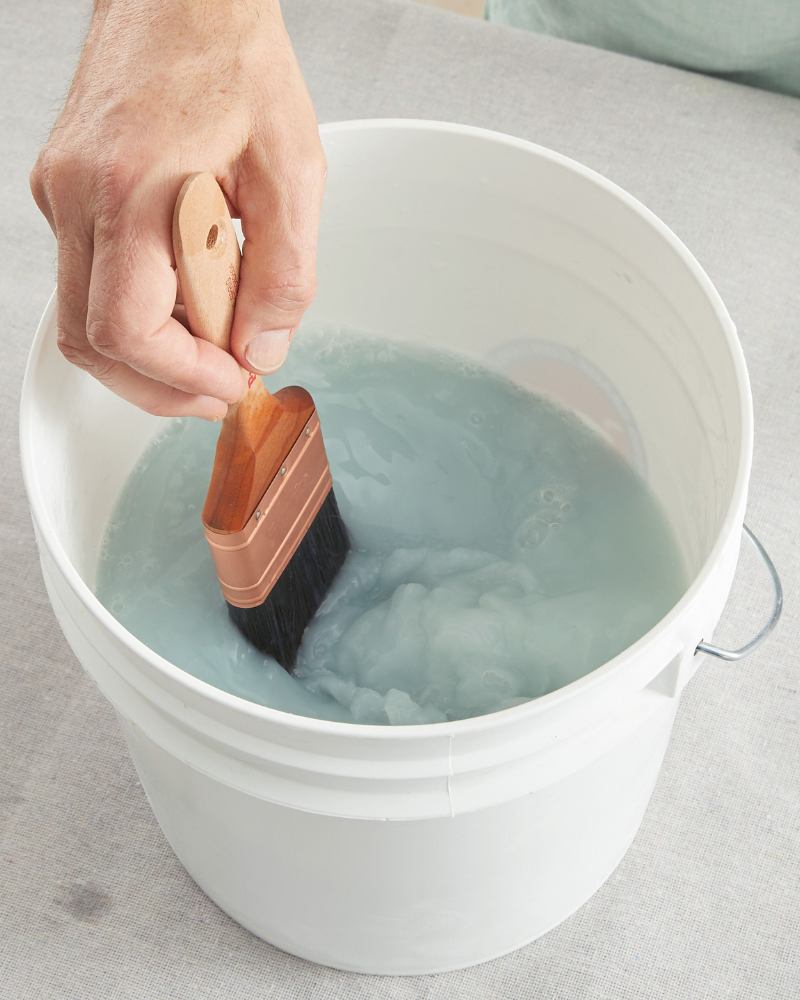
Dry No More
Working on a painting project and want to take a break but are worried that your brushes are going to dry out by the time you come back? That’s no problem at all! This works especially well if you prefer working with gloves.
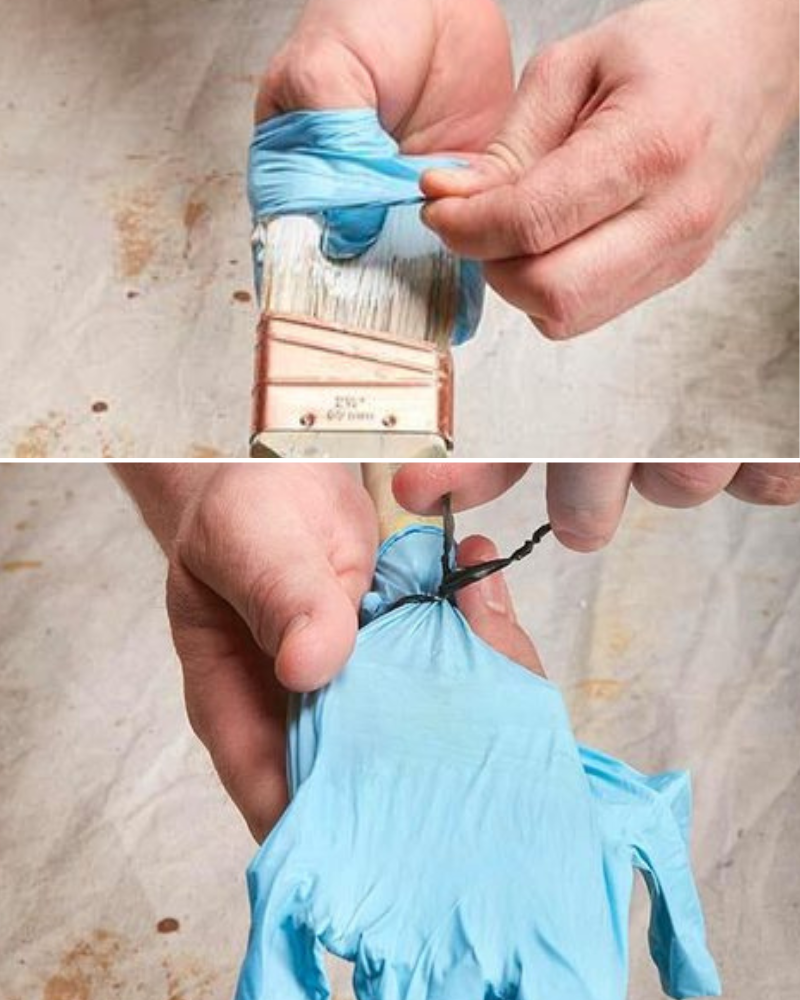
When you wish to take that break, just hold your brush with a gloved hand and flip the glove over the wet bristles. Just make sure to tie the glove to the handle so it’s air-tight.
Keep the Handle Clean
Look, no matter how much you try to be tidy, you’re going to get paint on the handle of your brush. How frustrating is it to try to clean all that paint up? Let’s face it, it’s never fully going away.
Thankfully, there’s a really simple hack to keep your brush handles clean. Before painting, just cover the entire handle (up to the bristles) with painter’s tape. Then, once you’re done, you can just throw the mess away, and the brush is ready for next time.
Fabric Softener for Clean Bristles
Want to start your day off painting but your brushes are crusty because you didn’t spend enough time cleaning them from paint last time? There’s no need to throw them away and rush to the store to get new ones.
Get out your fabric softener and pour some into a deep cup and mix with some water. Then, place your crusty brushes in the softener solution for about an hour. After an hour, wash them and enjoy your soft bristles.
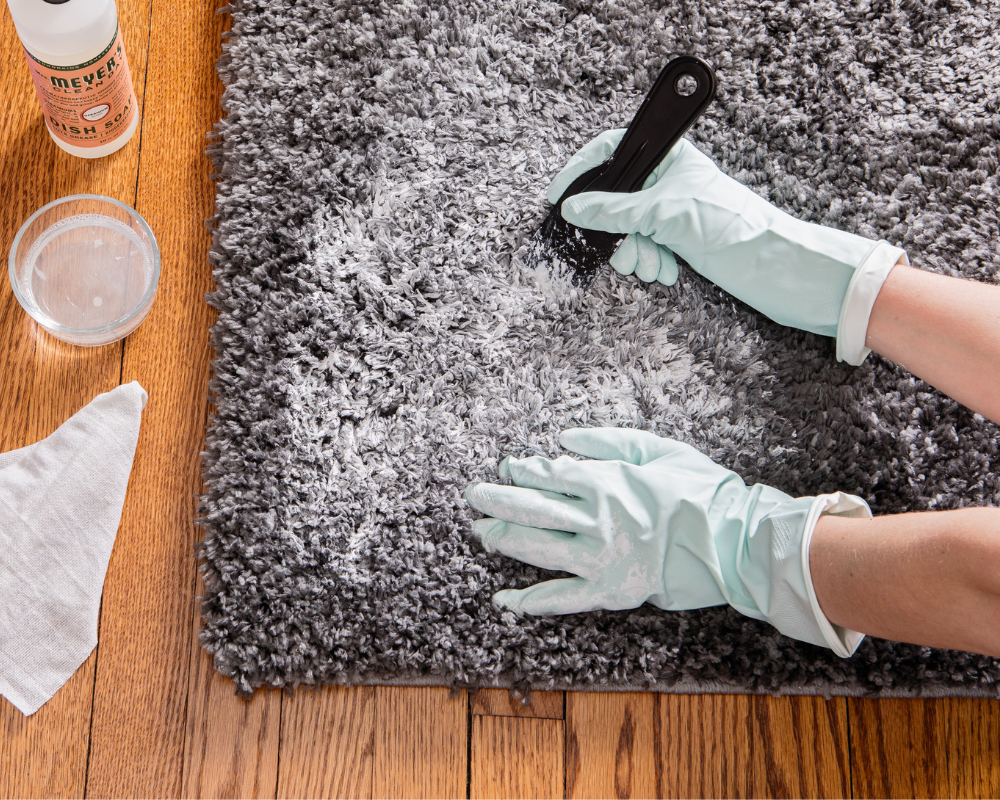
Crayon Picasso No More
Have kids who absolutely love to draw with crayons on the walls (driving you up those same walls)? Well, don’t go running to get new paint just yet. Here’s a trick to get your walls back to their crayon-free state.
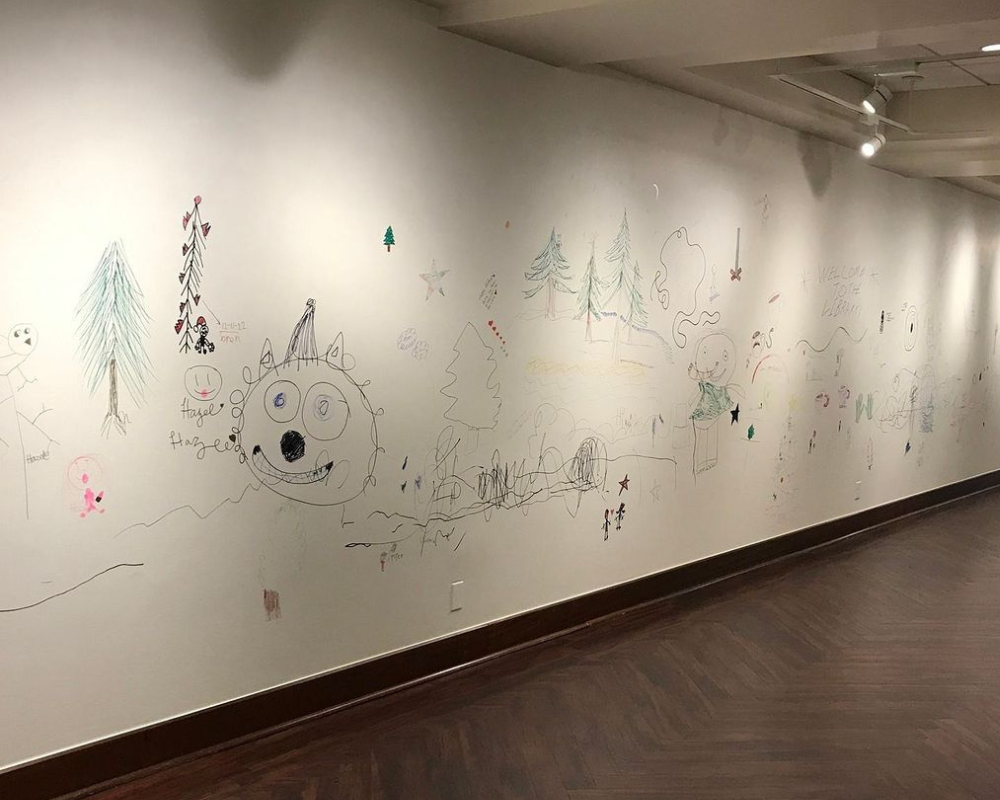
Take a rag and dab it in baking soda. Then, use it to lightly scrub where your children’s artwork is on the walls. In no time, your walls will be back to their pristine state, and you won’t have to spend time, effort, and money painting them just yet.
Bleach Stains Away
When it comes to your home, it’s just as important to know when you shouldn’t paint. For example, when it comes to hiding water stains on the ceiling, you can actually be rid of them without any paint involved. What you actually need is bleach!
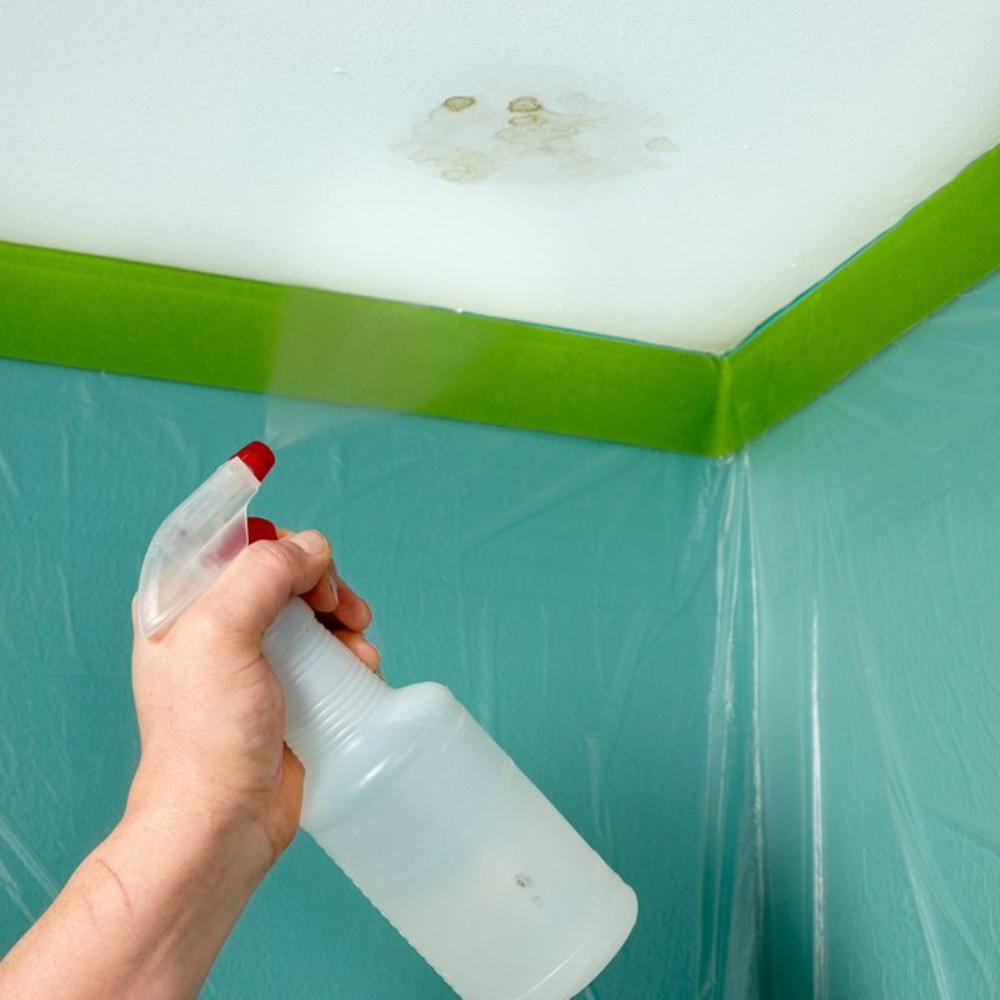
In a spray bottle, mix water and bleach (10% bleach). Spray the water stain and wait a couple of days. For older stains, use mildew remover. Just don’t forget to use safety goggles and cover your walls and floors with plastic so you don’t get bleach on them.
Clean Your Canvas
This might seem a bit strange, but when it comes to painting, before you even touch your brush or roller, you should wash and clean your surface. Keep in mind that your walls actually accumulate dust and dirt over time.

Therefore, to get the perfect finish on your new wall color, make sure to dust and wash your walls with a damp rag (you can even use soap if you feel like it needs a bit of extra cleaning).
Check the Weather
While it might seem fun to take up a painting project while it’s raining outside, you might want to wait for a sunny day. Trust us, this little tip will save you so much time! Basically, humidity and painting don’t go well together.
Beyond the fact that it’s best to paint in a well-ventilated area (meaning windows should stay open, which doesn’t really work when it’s raining), excess humidity can actually warp your paint, making it take longer to dry and possibly creating bubbles in it.
Keep the Box
Have you also been told that you hoard old boxes and containers of things for nothing and you should throw them away ASAP? Well, in this case, you should absolutely ignore all those people.
Once you got that brand-new brush out of its plastic container, keep it! Those containers are meant to stay as safe storage for your brushes. This way, your bristles won’t get crushed somewhere between projects, and the brush won’t lose its shape.
Stink Be Gone
Ah, that new paint smell! Oh, okay, that’s enough! Can we please smell something other than paint?! If that feeling is familiar to you, then this hack is perfect for you — add extracts to your paint.
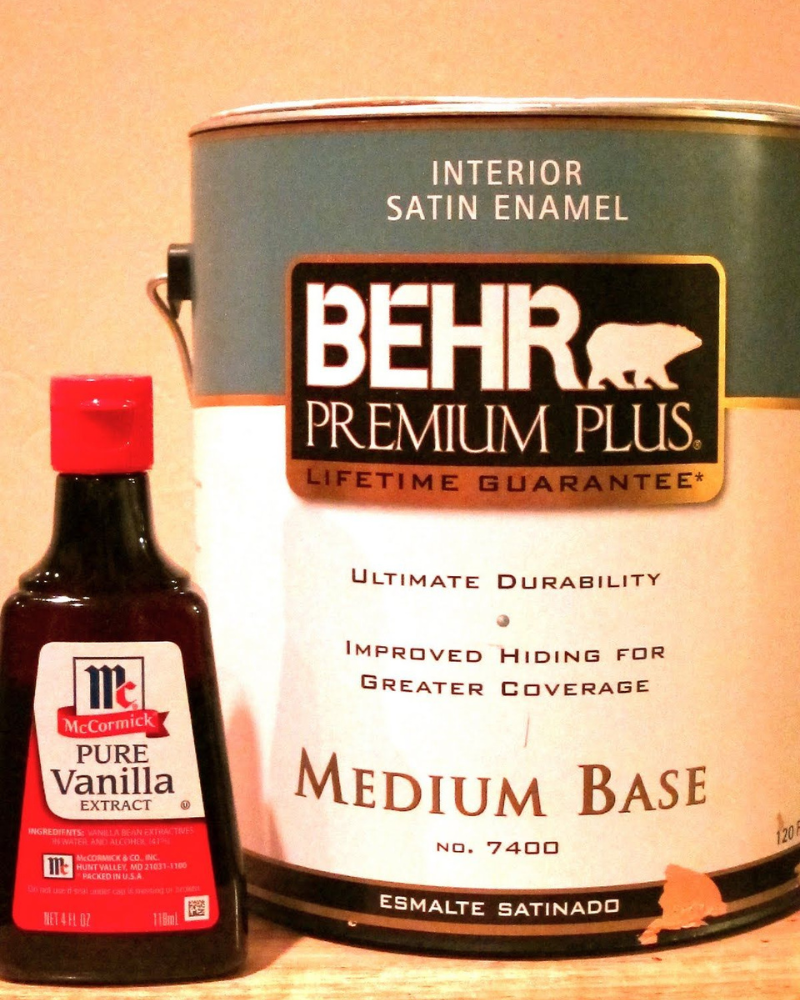
Yes, you read that right. You can add a couple of drops of extract to a gallon of paint to get a nice and refreshing smell in the room (don’t forget to still ventilate). Use vanilla for darker colors and lemon extract for lighter ones.
Baseboard Overhang
Need to give your room a makeover but already dreading having to tape up every inch of baseboard? Have we got a clever hack for you! This one takes inspiration from your own roof.
So, instead of taping up the whole thing, just run a single strip of wide tape over the top of your baseboard with most of it hanging over the board. This way, all the paint splatters and dribbles from your wall will be caught by this overhang instead of your pristine baseboard.
Baby Oil
Choosing what kind of paint your project requires is one of the most important first steps to any painting job. But, if you were leaning away from using latex paint for fear that it’ll never come off your hands, here’s a trick.

Instead of regular soap (which would easily get water-based paint off your hands), use baby oil. The baby oil will get all that latex paint off your hands in no time!
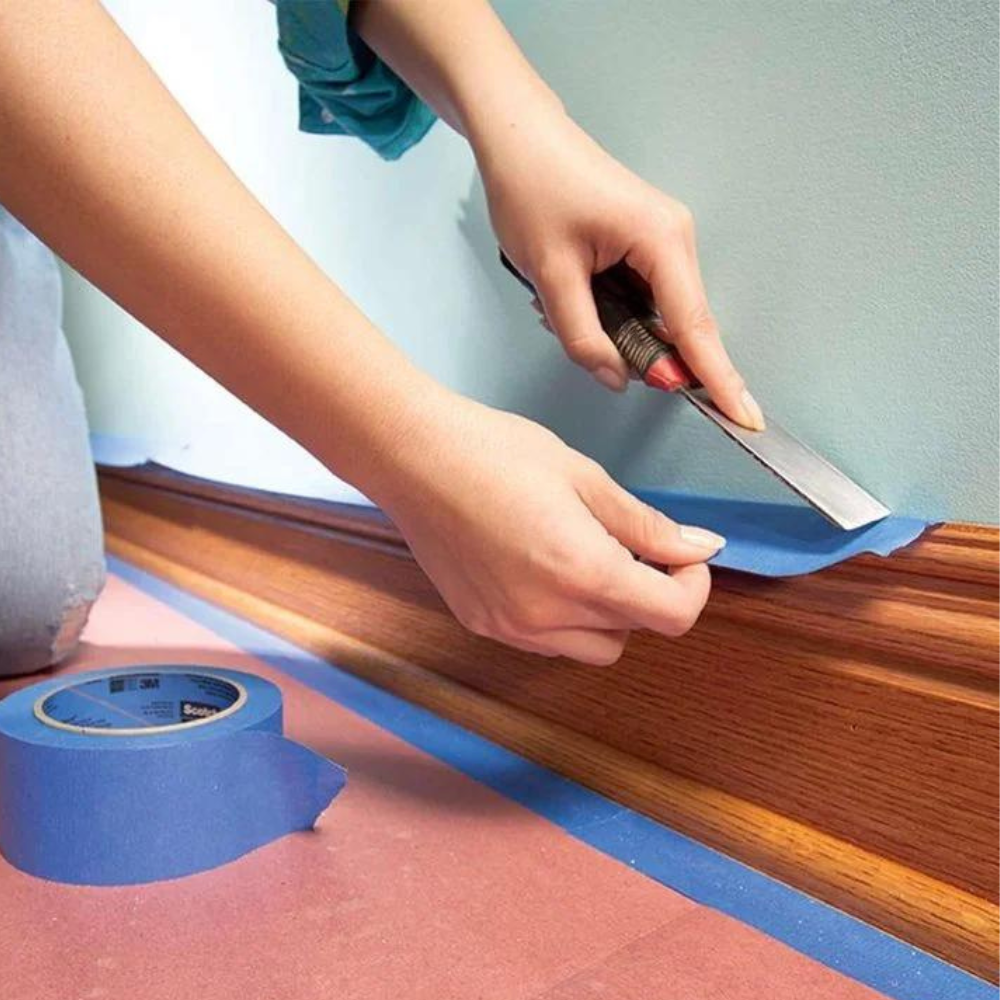
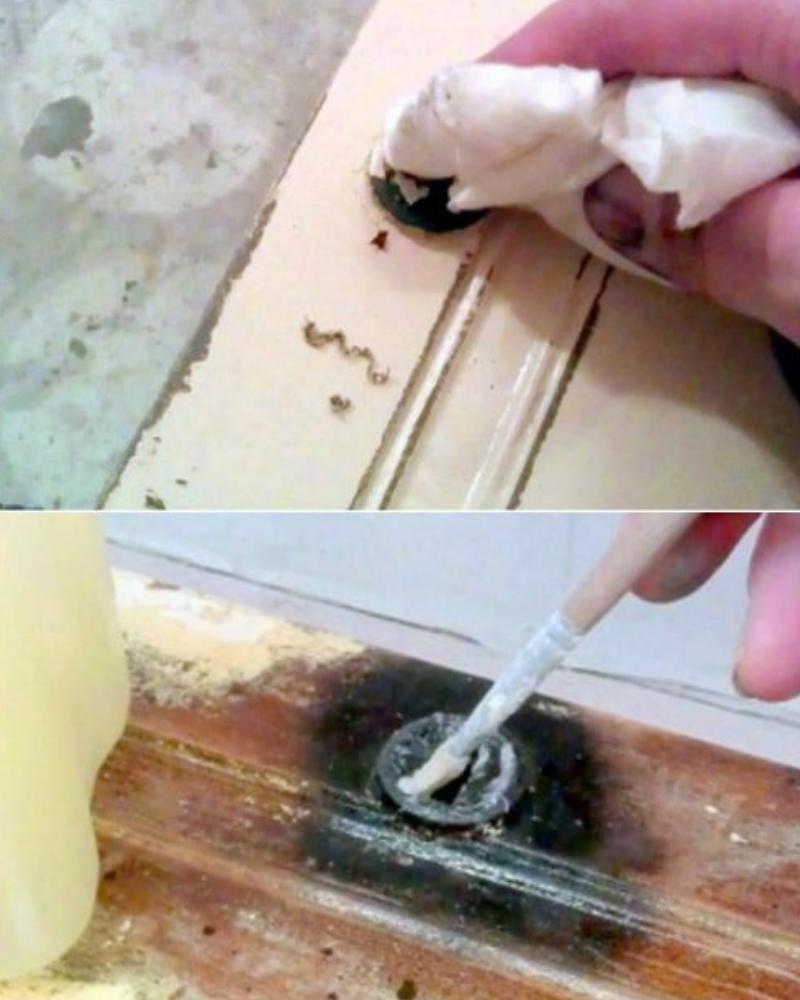
The Secret Is in the Putty Knife
So, you decided to go ahead and put painter’s tape everywhere before starting to paint but forgot to double-check that it was firmly placed, and once you took off the tape you found tons of paint behind it? You’re not alone!
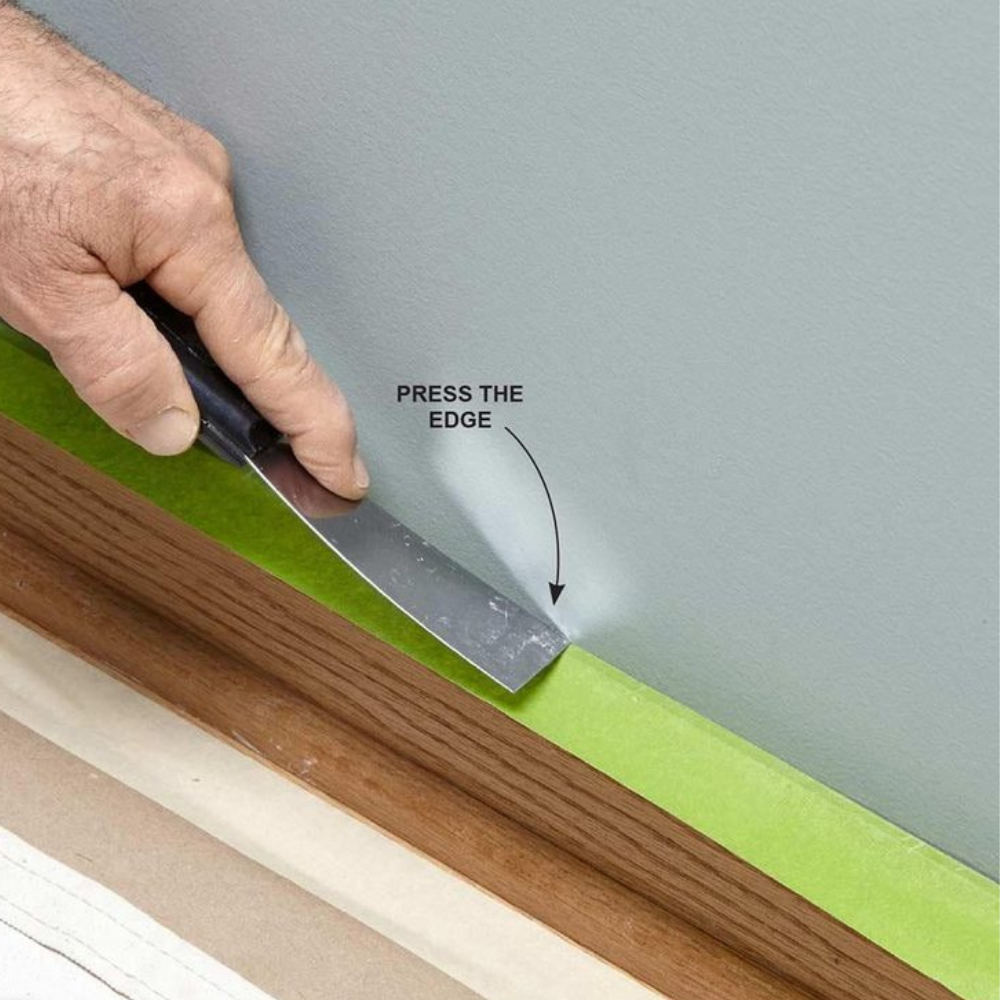
To make sure this doesn’t happen, the pros recommend using a putty knife to ensure that every single edge of your tape is fully pressed into the surface and won’t allow any paint to bleed through.
”Box” Your Paint
This hack depends on whether or not you require more than a single can of paint for your project. If you need more than one can of the same color, you might want to think about “boxing” your paint. It turns out that every can comes out a slightly different shade (yes, even if it says they’re the same color).
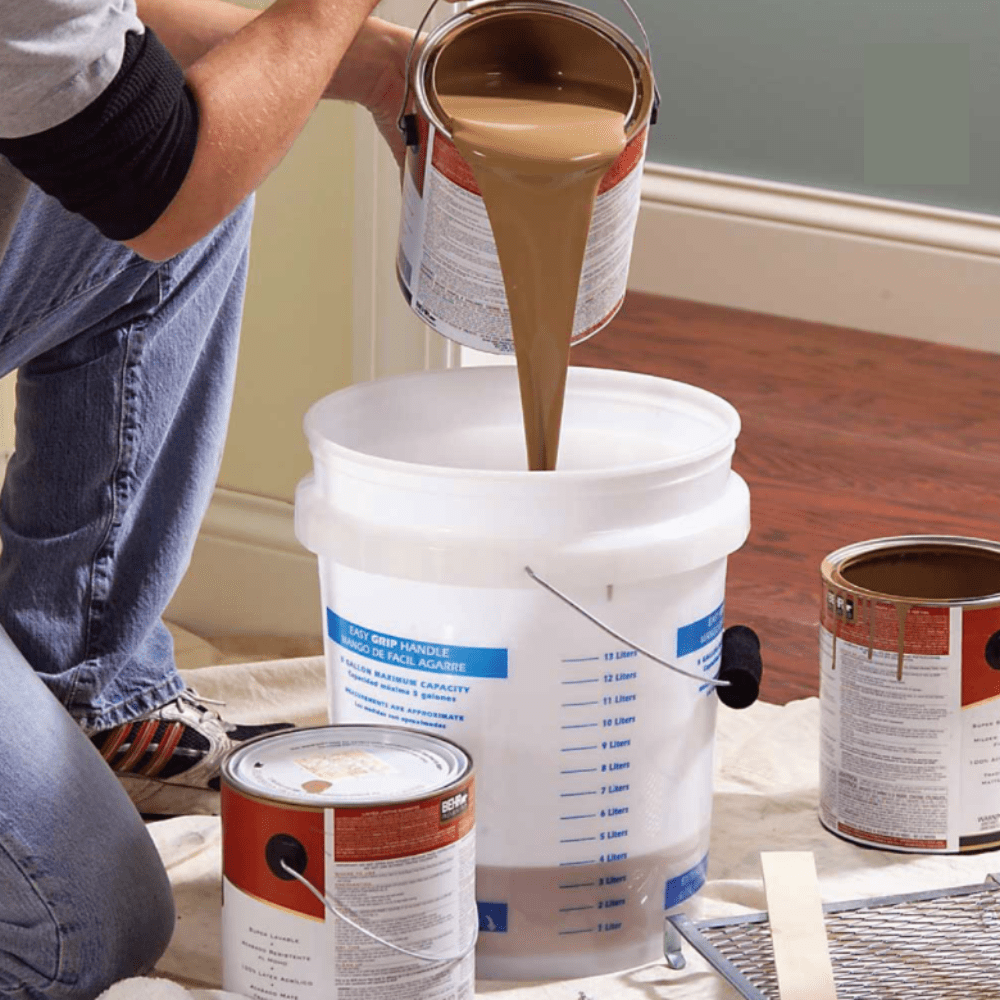
So, instead of painting half your wall a different shade, do what the pros do — open several cans and mix them in a single bucket. This is what professional painters call boxing paint, and it ensures that everything comes out looking exactly the same.
Cotton Swabs Anyone?
Brushes, painter’s tape, and a ventilation mask might already be in your painting toolbox, but you might want to consider adding something else — the humble cotton swab. Those little Q-tips are going to save you a whole lot of trouble in the long run.
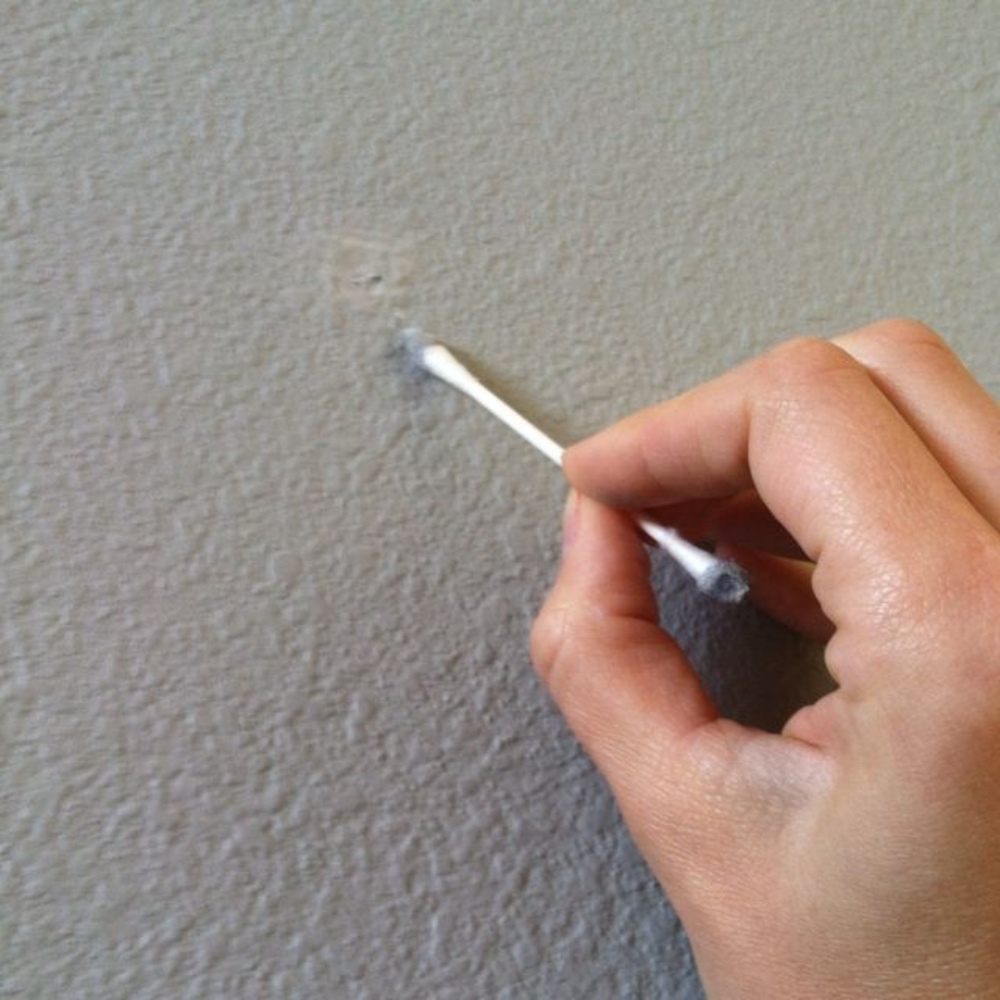
A cotton swab comes in handy basically every time you make a small painting mistake. A little paint managed to get behind your tape? A few drops fell on the trim? Just clean it up with your pocket cotton swab!
Pringles Time!
We bet that you had no idea that this beloved salty chips container could actually come in handy when dealing with painting your home. It turns out, though, that Pringles containers are the perfect size and length for your rollers.
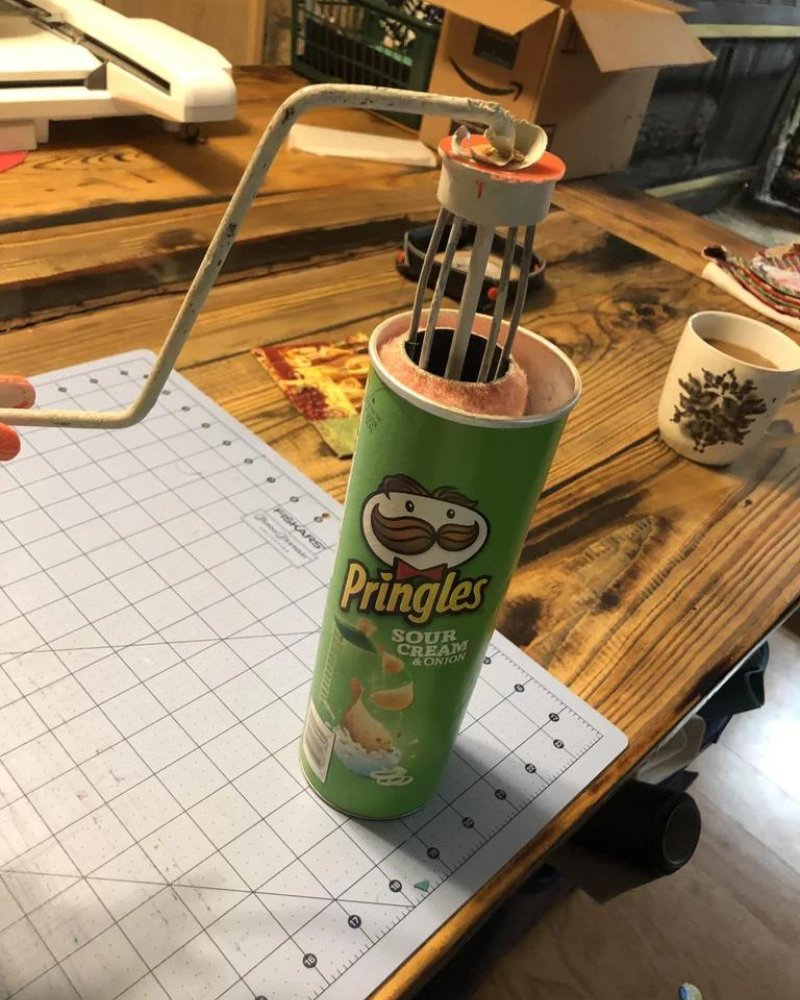
So, instead of just throwing your paint rollers in the garage until the next time you need them (only for them to get smashed between everything else there), place them with a plastic covering in the Pringles can for safekeeping.
No More Paint on Glass
Everyone who’s tried to paint a window trim has struggled with getting the excess paint off the actual glass with a toxic and gross paint stripper. We’re here to tell you that you don’t have to use a paint stripper anymore!
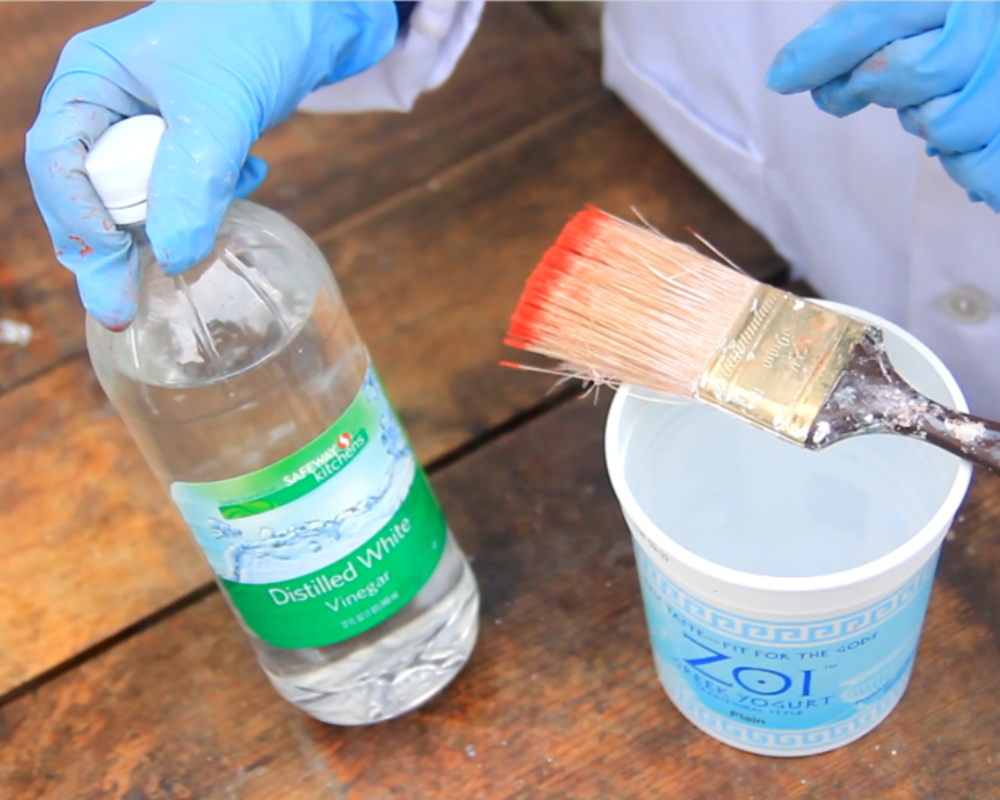
In this case, warm vinegar is your friend. Just heat up white vinegar in your microwave. Then, with a bit of cloth (you can use an old T-shirt), wipe away the excess paint. It’ll be gone in no time!
Shave the Paint Away
No matter how much we might try to keep our nice clothes paint-free, if we’re mid-painting project, some of our favorite outfits are going to get paint on them. Luckily, you can easily salvage them if it’s a few drops.
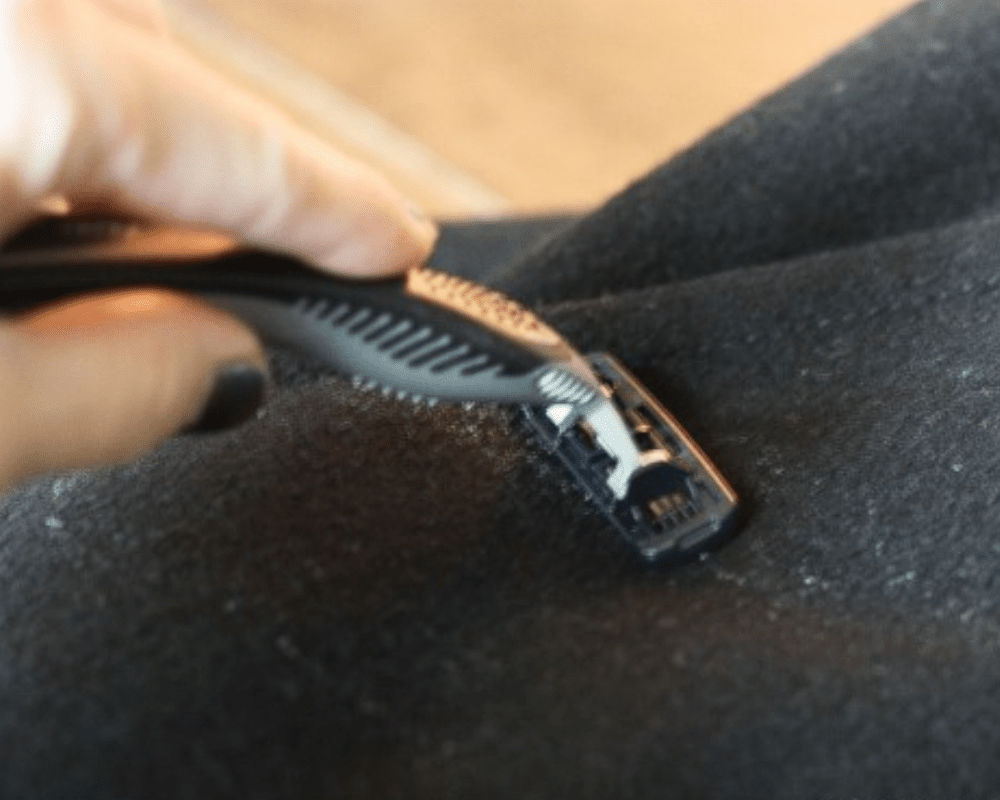
Just like those internet hacks for getting rid of lint, get a sharp razor and shave your fabric with short motions. Make sure not to apply too much pressure, but go over the stained spot until all the color is gone. This hack isn’t recommended for cotton clothes.
Paint Cement
Have a cement floor that you want to bring back to life with a little paint but are worried the color won’t last long? There’s a well-known issue with paint on cement peeling or cracking after just a few years.
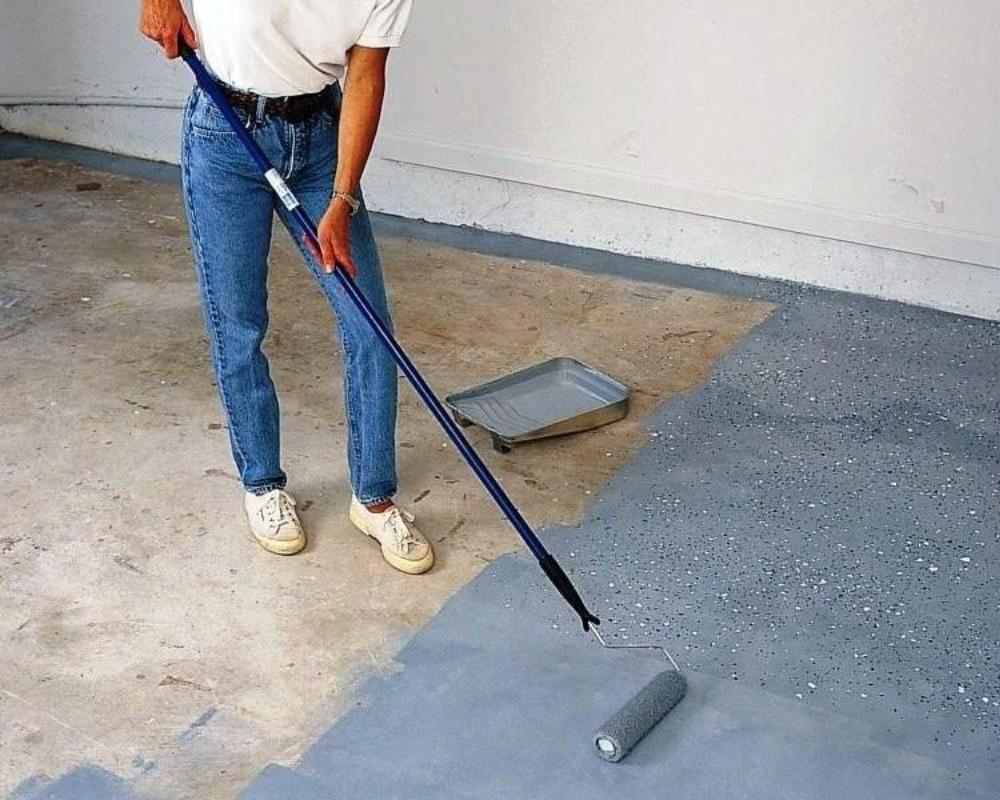
Thankfully, in this, too, you can use vinegar. Just give the cement area you wish to paint a base coat of white vinegar. Just make sure that it fully dries before you start painting the color you actually want.
No Stained Carpets
So, you spilled some paint. If it’s on the floor — no worries! You’ll just get a rag and wipe it away with ease. But, what are you supposed to do when your paint spills on your carpet?
Don’t wipe! That will just get the color deeper into the fabric. Instead, scoop as much as you can with a putty knife. Then, dab and blot the rest with a wet rag. Just make sure to do this as soon as you notice the stain.
Vinegar Bath
While fabric softener will unstiffen your brush bristles, it’s not going to fully help in cleaning old paint from your brush. So, if you ever forgot to clean your brushes for a while and wanted to start another painting project, this one’s for you.
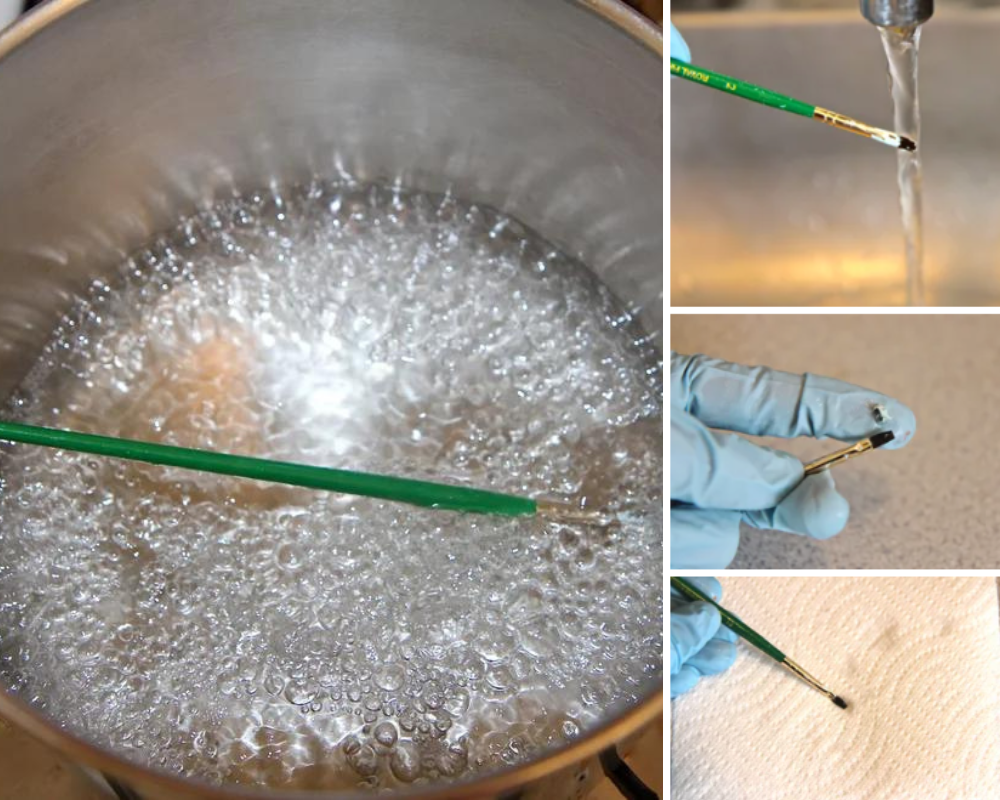
In a pan, bring white vinegar to a boil. Once it reaches the right temperature, place all your old dirty brushes inside. Let them simmer in the pan for about five minutes. Then, remove and clean with hot water and soap.
Hold It!
If you’re working on a small paint project, there’s really no need for you to haul an entire bucket and paint tray with you everywhere. Instead, try this hack to create a portable and manageable paint holder.
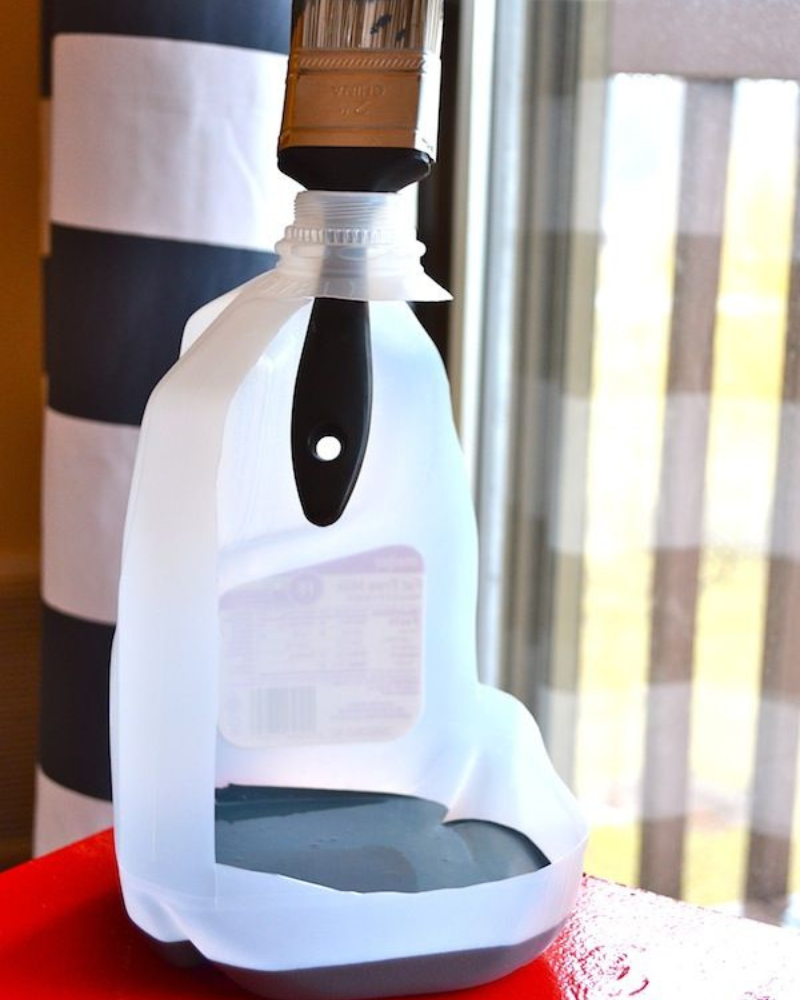
All you need is an empty and clean milk jug and scissors or a box knife. Then simply cut out the two sides of the jug that are opposite the handle, leaving the bottom deep enough to hold the paint. You can even use the top as a brush holder!
Spray in a Box
While painting a room, you’ll find many odds and ends that require an extra touch of paint, like door knobs, outlet covers, or light fixtures. Now, the best way to do that is to take them out of the room and spray paint them. But here’s a great tip if you don’t want paint everywhere on your lawn.
Take a large cardboard box and turn it so that the opening is to the side. Place a small hook on the inner top. Then, just hang whatever you want to paint from the hook with wire and spray paint. No more paint splatter everywhere!
Prime Things!
So, you’ve chosen a beautiful new accent color for your walls, and you want to get to painting. But wait! Don’t rush in before priming! The most important step before priming is to know what kind of paint you currently have. Just use some ethanol, if it mixes, you’ve got latex paint, if it really doesn’t, it’s oil-based.
Now, in both cases, you should prime before painting. But, if you do find that your current wall paint is oil-based and you want to paint with latex, you need to first sand the surface or use an oil-specific primer. The rule of thumb is — latex on latex and oil on oil.
Use a File Folder
You’ve covered all the frames and painted in the large areas. But now you’ve probably got to do some fine line work in areas where you didn’t, or couldn’t, tape and don’t want everything to be a mess. Instead of spending time taping once again, use a file folder.
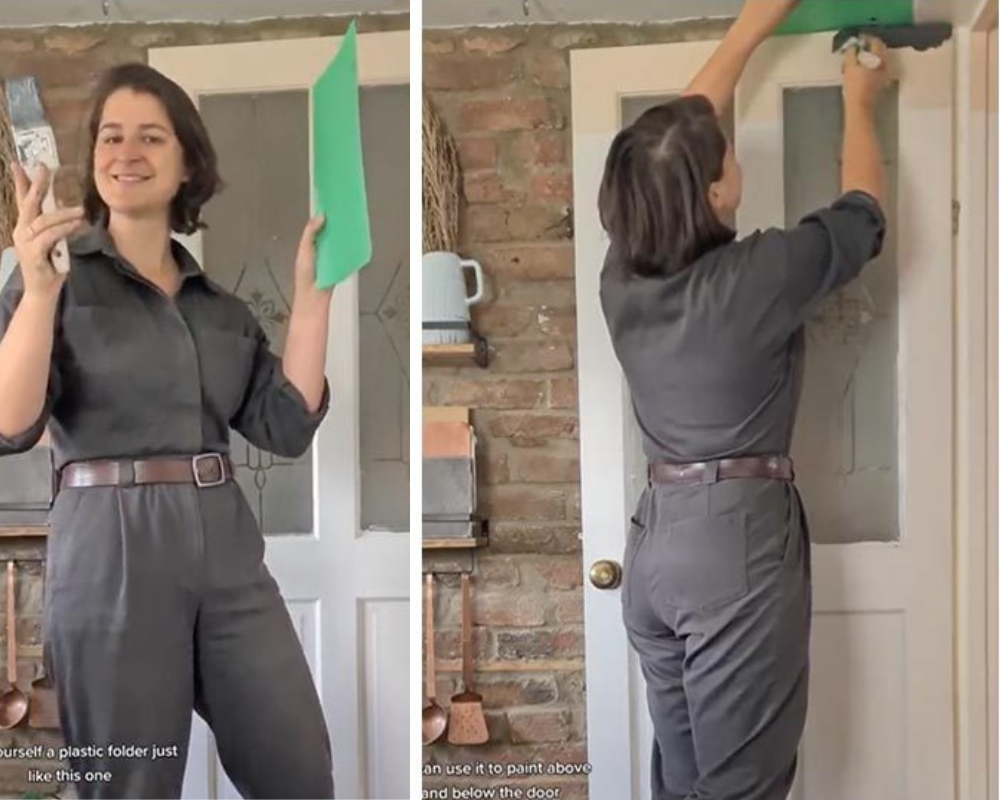
Just place the file folder on the edge of where you want to paint. Then, gently and precisely move the folder along with you as you paint. This will give you a clean line and a straight finish to your painting.
In a Tight Spot
Having trouble with a tricky corner of the room, or painting behind a fixed piece of furniture? This hack is the perfect fix to this problem! With some hot glue, stick a paint edger pad to a stick.
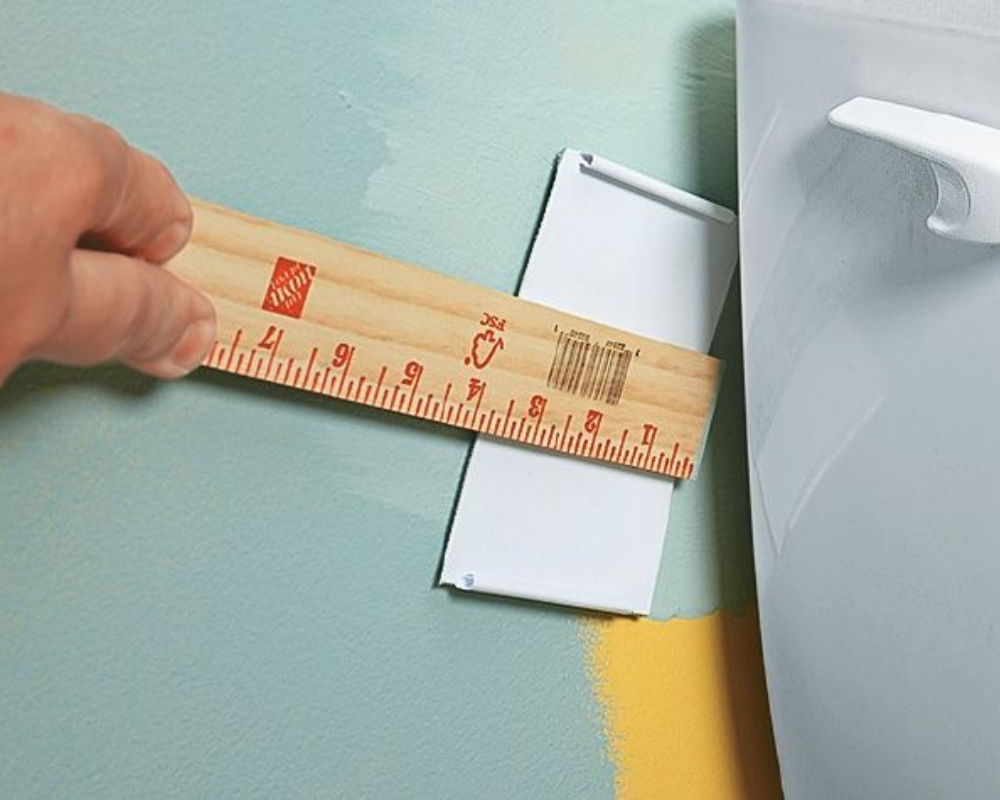
This new tool will allow you to reach a narrow or complicated area of the room with ease and accuracy. This is especially useful when painting behind toilets, around the sink, and in areas with air conditioning units and radiators.
DIY Wallpaper
Using wallpaper instead of painting a room is certainly an option that exists. But, if you want to let your creative juices out with paint while still getting the wallpaper esthetic, try out his DIY method.
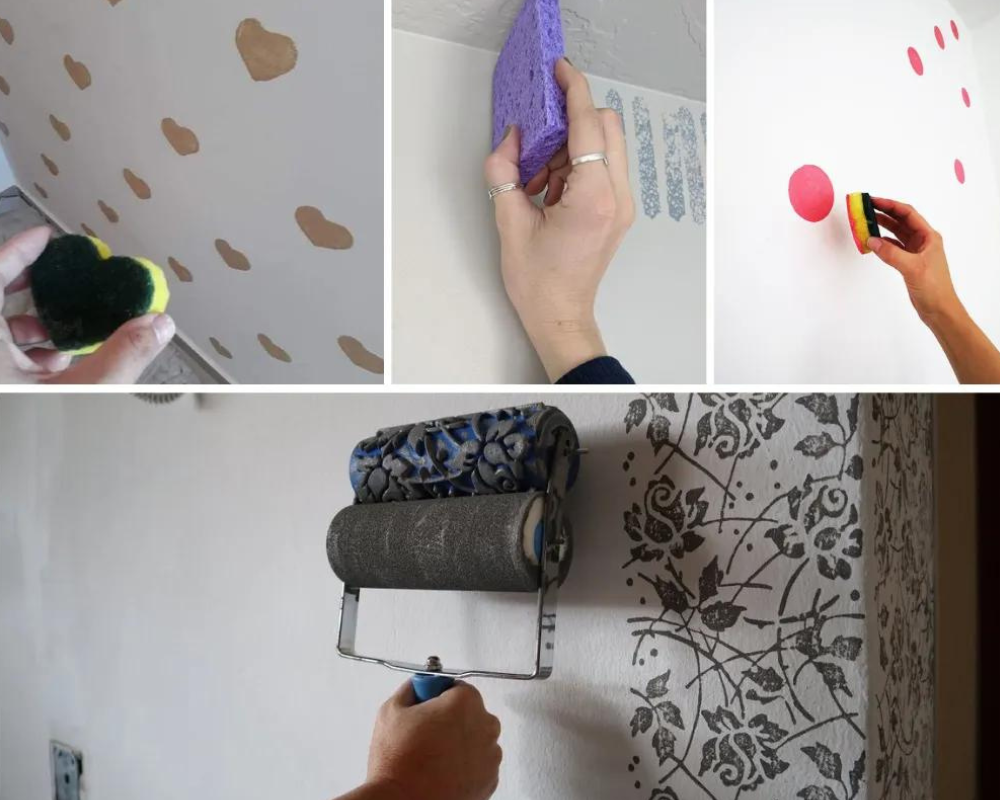
For the best result, choose a design with simple, abstract shapes. Then either find an object in that shape or cut it out from foam. Dip your shape in the fun color you chose, then go to town and enjoy pressing it onto the wall like a stamp.
Drop Cloth Corners
Anyone who’s ever tried to prep a room for painting with a drop cloth has been through the struggle of needing about 500 hands to manage to actually lay it flat through the entire space.
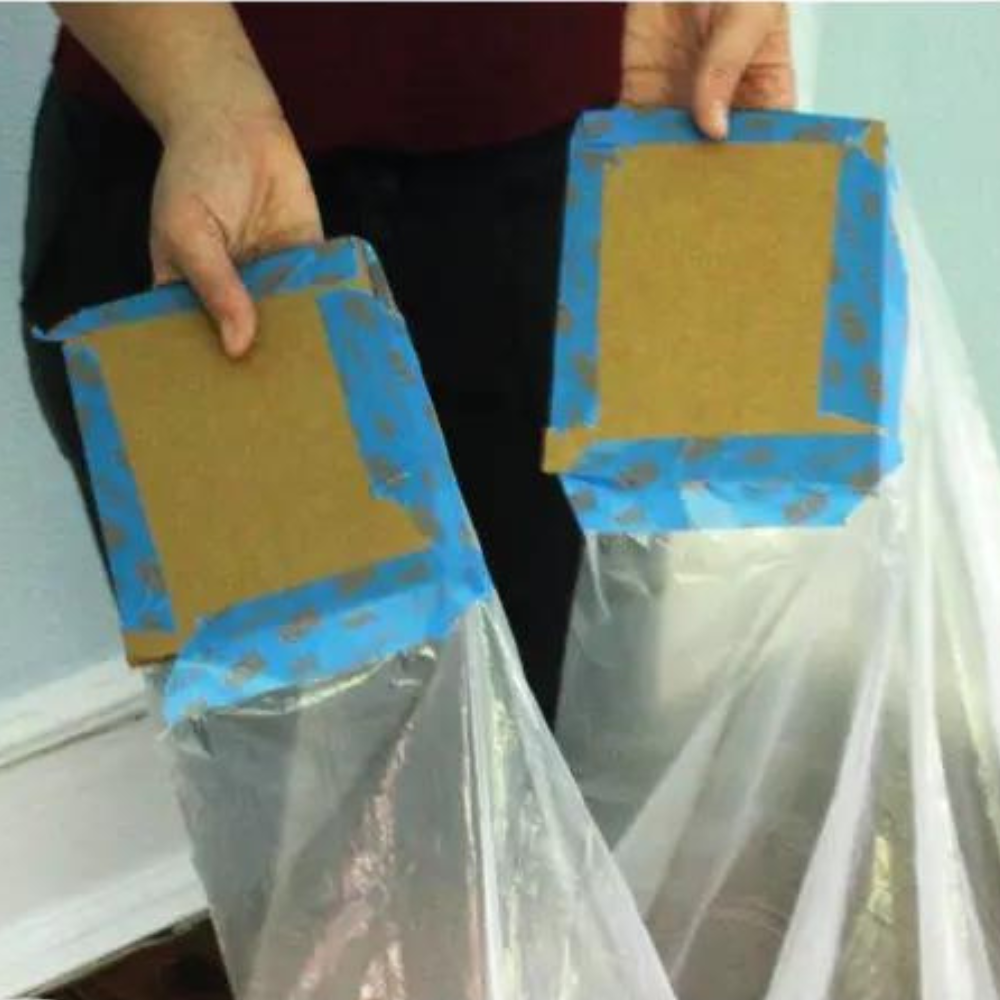
Luckily, this has a simple solution. All you need is cardboard squares, tape, and your drop cloth. Simply use the tape to stick the cardboard squares to the corners of the drop cloth. This will allow the corners to be heavy enough to be placed easily.
Vaseline to the Rescue
Believe it or not, vaseline can be used for more than just TikTok skin trends. While you might be accustomed to using petroleum jelly for your chapped lips, it can actually also be used while painting. This hack will save you the trouble of having to cover every little detail that you don’t wish to paint.
While you might use masking tape to hide large areas that are meant to stay paint-free, when it comes to small sections, just cover the little area with Vaseline and paint around it. The jelly will ensure that the paint doesn’t stick to the covered area.
The Lazy Tip
Not feeling like covering your paint tray with aluminum or plastic? No worries — just don’t! Seriously, you don’t actually have to get your paint tray cleaned between uses. For this tip, though, you have to have patience.

You just have to make sure that the paint that was already in the tray has completely dried before you use it again. So this only works if you’ve got time. Some handymen, though, prefer this method as the paint that accumulated makes the tray more sturdy and less prone to sliding.
Movies might have many of us convinced that painting our walls is a romantic and easy endeavor, but the truth is that there’s a lot more to it than just getting a paintbrush and going to town on your walls. So, to actually make it simple and fun, here are our favorite tips and hacks for painting your home with ease.